
My previous article on Visualisation of the Image, clearly owes much to systema formulated by Ansel Adams, though I did not described the Zone System in detail.
Adams formulated the Zone system to support his method of working, controlling the contrast and dynamic range possible for his intended output – the print. He describes his system in the second of his three tutor books – The Camera, The Negative and The Print. In a nutshell he would adjust exposure in camera, and development (in both chemical strength and time immersed) in order to achieve the image he visualised.
It is vital to take on board that the final image is visualised at the earliest stage, the actual exposure and image manipulation thus realising that visualisation.
To reiterate:
Commit
- Recognition and assessment of the (likely) subject
- Application of the resources required
- Selection of focal length
- Selection of ISO, then aperture/shutter speed
Consider
- Shooting the image
- Processing the image
- a) Conversion from RAW
- b) Enhancement
- i) Cropping
- ii) Tonal adjustments/sharpening
Control
Rendering and Displaying the image
1) Print / Web / Tablet
2) Media choice
When considering tonality it is important to register that digital sensors ‘see’ in black and white, and only drive colour from the overlay of Bayer-type filters on to the sensor. When Adams formulated his system he was working in a bright atmosphere such as Yosemite, and one should also remember that tastes change – we now tend to produce photographs with lighter skin textures as a matter of course. Additionally, Caucasian skin in northern Europe may be slightly lighter than typically in the United States or southern Europe. Tone values also alter in the studio. The various zones are described by Adams:
Low values
Zone 0 Total black
Zone I Slight tonality but no texture
Zone II Suggestion of texture, deep tonalities, represents the darkest part of the picture where detail can be distinguished
Zone III Average dark materials and low values showing adequate texture
Middle values
Zone IV Average dark foliage, dark stone, landscape shadow. Normal shadow value for Caucasian skin in daylight.
Zone V Middle Grey (18% reflectance), dark skinb, grey stone, average weathered wood.
Zone VI Average Caucasian skin value in sunlight, diffuse daylight or artificial light. Light stone, shadows in snow in sunlit landscapes
High values
Zone VII Very light skin, light grey objects, average snow with acute side lighting
Zone VIII Whites with texture and delicate values, textured snow, highlights on Caucasian skin
Zone IX White without texture (akin to the opposite in Zone I). Snow in flat sunlight. “Zone IX may print as pure white, not distinguishable from Zone X.”
Zone X Pure white of the finished image. This includes specular glare or light sources in the picture area (ie burnt out).
When reading these descriptors it is easy to relate them to digital issues – the description of Zone IX neatly encapsulates the difficulties with sensors and bright light. It is interesting that he divides the Zones into three sections, especially valid in the digital era when we are aiming to ensure that the critical exposure areas are adjusted to place in those middle value zones.
For ourselves, we may not feel either competent to spotmeter every value in an image prior to taking the picture – though we can make a judgement from the histogram. The histogram however, does not place values in the Zone system ranges, but assumes the image is centred around 18% reflectance. If the photographer is versed in the Zones as described, the photographer can adjust exposure in order to accurately place tones.
The photographer must therefore use the histogram advisedly. Personally, when I am shooting, I usually use aperture priority but use the AE-lock button to fix the exposure on what I wish to be the medium tone of the shot, though some would meter the whole scene and use the compensation control, or others shoot manually after metering elements of the image.
Adams describes at length how he would place tones by utilising the Zone descriptors, but in the digital domain it would seem that we use it in a modified manner. Because we have tools such as the histogram (some cameras can give more detailed CMYK readouts) we can place the priority elements of our image in the Zone scale.
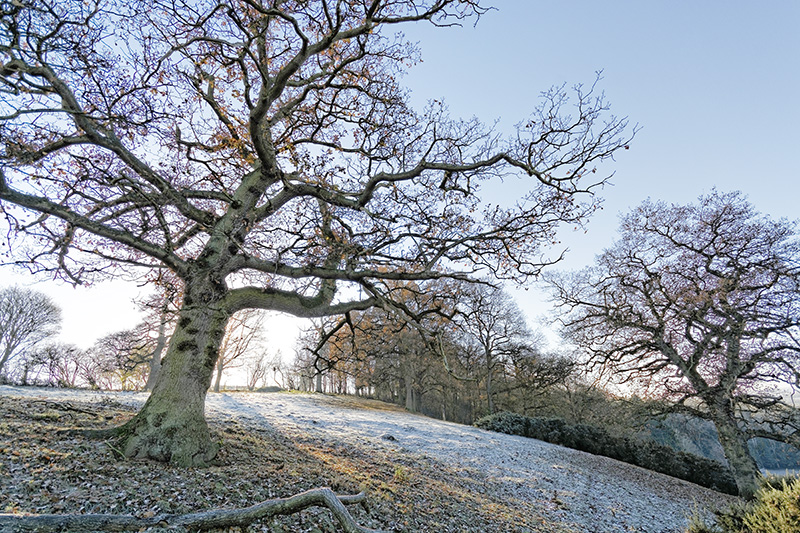
An attempt was made to find a neutral 18% reflectance within the frame of the following image. The subject has great variety in light intensity; the aim was to find a Zone V somewhere on the ground where it transitions from the earthy tone to the frosted grass in shadow.
Firstly, the most typical image centred around average tones:

I II III IV V VI VII VIII IX X
The equivalent analogue processed print would be a well exposed negative printed on normal paper.

Secondly, an image where the darker areas need to be lifted or given more emphasis, or where the photographer wants to retain detail in the darker tones :

I II III IV V VI VII VIII IX X

This is the effect if the 18% area is now in the brighter frosty areas; the image is now darker. This equates to a thinner negative.
Thirdly, an image where the photographer is avoiding highlight clipping, retaining tones at the lighter end of the scale.

I II III IV V VI VII VIII IX X
This time the darker bark of the tree has been made into the mid-tone consequently lightening the whole image. This would have produced a thicker negative.
The photographer thus has choices of interpretation as to what emotion is wanted from the image between the subdued darkness or subdued brightness, or clarity of brightness.
Finally there can be another diagram illustrating how HDR can function, with extra exposures to include the red areas can cover a wider spectrum. In this case there may be issues of ethics as well as the creation of an unusually wide range which in the final image could look unnatural. However, this final shot of Drover’s Pool has been processed as HDR (single shot) in order to record as wide a range as possible. The water has been brightened, the trees and sky darkened.

I II III IV V VI VII VIII IX X

To go to other Gallery pages click from the menu

Contact Phil at philtheclick@gmail.com
If you would like to leave a post, or contact Phil please email or use the COMMENT page for your response. Your comments/views are invited! There are hundreds of Phil’s images at alamy – clicking the ALAMY logo take you to that site
